Tuesday, November 26, 2013

A quick review of my new fishing gear

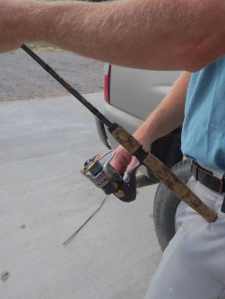
A long time ago I joined a club that offered *free* stuff that you could test and keep, as long as you reviewed the product and sent it back to the company for publication.  Since that time, the club has grown, the items I’ve received have continued to get better and just recently I received my best test yet.  The Cabela’s Prodigy MG40 spinning reel.  Granted that it’s been a few years since I’ve bought any new reels, let alone a spinning reel, but this reel is a beauty right out of the box.  Although it’s a bit larger than some others I’ve used, it’s bulkiness doesn’t take anything away from it.  So far it appears to be made out of quality materials, although time and continued use will tell.  The thing that surprised me the most was how smooth the reeling is on this thing!  I can honestly say that with the gear ratio and the ball bearings, this is one of the smoothest spinning reels I’ve ever used.  I really like the anti reverse mechanism as well.  The only downfall I found with this reel is it’s casting distance is not as far as some other reels I own.  It almost seems as though the line drags a little too much against the top of the reel and slows down the cast.  I switched from the braided line to a mono-filament and that didn’t help it either.  I’ve only had a short period of time to test this reel so far, and once we’ve made it through the striper season this winter, I’ll come back and update this review if I need too!  The only reason it didn’t get five stars is because I do have a reel that can outcast it, but overall the casting is still smooth and I think it’s a great reel, at a great price.
So if you see the 3 stars on Cabelas page – I just don’t see it.  I really do think it’s a good reel, but plan to put it to the real or reel test come this winter when the rock are running!  Can’t wait to snag one on my ugly stick with this thing!  Stay tuned to see if I change my mind!

reel2
reel

Friday, March 15, 2013

Septic Systems

I never would have thought that putting in a septic system could be so durn hard.  Evidently when you've had week after week of torrential rains, and the water table is only 2" below the surface, putting in one of these babies is a chore - let alone two of them. 

Yeap - you heard me right. We had to have two tanks to pass inspection. It's a lift system technically, but waste goes into tank number one, then tank one overflows into tank two, which is then pumped back up to the drain pipes in the new "built up" field in the yard. I'm glad I have a lot of back yard, otherwise, this could have been a BIG mess!

BUT  - Yesterday it passed inspection!  So YIP-EEE! On to something bigger and better.... (and hopefully a lot easier!)


Tuesday, March 5, 2013

The upstairs bathroom is almost done!

The girls bathroom upstairs is almost finished!  Just a few minor paint touch-ups, a wipe of poly over all the wood for good measure, the cabinet and drawer pulls and she'll be ready!
 
 
 This room is so hard to photograph because of the layout, but I promise to get better pictures once we get the mural on the wall.
 
 
Oh yeah - did I forget to mention that?  One of the first things I bought for the house, even before we started digging the foundation was a mural to spruce up one of the bathrooms.  It's a coral reef mural....
Sorta like this one.....
but with a few less dolphins, then throw in a huge shark and a sea turtle ;) 
But you'll have to wait and see the final results!
 

Monday, March 4, 2013

The Concrete Pad

We've been waiting over a month for this, but the weather just didn't want to cooperate! We finally got the concrete apron in front of the garage poured on Saturday! And as you can see, it's already being enjoyed! :)


Friday, February 22, 2013

Kitchen Cabinets

I know I said I wouldn't post anymore cabinet pictures until drawers and doors were installed, but I had to share these pictures of my hickory cabinets!  I'm in love!  Jeff built all the bases on site, but all the doors are ordered and are coming from a cabinet shop in Chesapeake.  I can hardly wait to see them all together!

 This is a shot taken from the Living room looking back into the kitchen.  Look closely and you'll see the Fridge, Freezer and oven hiding in their new hideaways!  The bottom front of this island will be covered in airstone!


And here is a shot of the galley part of the kitchen.  The Fridge and Freezer are just out of the picture to the right, and the laundry shoot access will be between the upper cabinets on the left and go all the way down through the bottom cabinets.

Tuesday, February 19, 2013

Laying Tile

When Jeffrey first told me he was going to do the tile work himself, I have to admit I was a little skeptical.  There was a lot of prep work to do, a lot of youtube video how-to's to watch and a lot of patience to come.  We wanted the job done right, so there was no cutting corners here.  First things first was to put down a layer of hardibacker board over all the floors and walls that were to be tiled.  Here you can see Jeffrey working into the Master Bath from the closet area with the thinset.  The boards were all pre-cut and put  in place and then we came back with the thinset and screws to secure them.  This part alone took a good part of a week working off and on.
 
After all the backerboard was installed on Friday, I started laying the tile out in the powder room to get a feel for the layout, and the easiest way for cuts.  Since it was such a small room, I just went with a standard grid layout and this room went pretty fast.  Cutting the circle around the toilet flange was the hardest part (FYI - I didn't do any of the cutting).  Here is a shot of the room after we came back on Sunday and cleaned it up a bit.  Looks good to me!


Of course Saturday we were back at it again, this time in the upstairs bathroom, finishing up what we couldn't get done the night before.  The upstairs bathroom has the same tile layout as the powder room above.  It also went pretty fast, but I forgot to take any pictures of the finished floor!
 
Then we started in the kitchen.
 
 I had decided the grid layout looked okay in the smaller bathrooms, but I had already had it on my mind that the kitchen and halls were going to be on a diamond pattern.  I didn't like the idea of looking down those long straight (or not so straight) grout lines.  So it took us a little while to determine the best layout for the floor, and finally pop a chalk line to get us going. 


After doing the front section of the kitchen, we moved around to the galley side of the kitchen,  about the time it started snowing! Poor Jeffrey was out there on the porch getting snowed on all afternoon while his tile saw had ice sickles hanging from it by nightfall.

 But we got the kitchen finished and we came back Sunday afternoon to do the back hallway.

 
Last night we started and finished the walk-in closet, and tonight - we're in hopes to finish the floor to the master bathroom.  So as you can see, it's a work in progress, with a long ways still to go.  A few hours here and there doesn't seem like a lot, but every little bit goes a long way!
  (I still have no idea on when the tub and shower will get tiled!)


Wednesday, February 13, 2013

Steady Progress

Every day I see steady progress, which is great at this point.
 
The nursery door is hung and just needs some poly, 
 
The same goes for our bedroom door.  The pantry doors you see in the background still need stain, and we're still waiting on the arrival of the pocket door for the bathroom.


The outside fans are ready to rock and roll as well as all the exterior lights and receptacles.  The front porch even has motion lights waiting for guests (and electricity).


We even got a little funky with the sconces in the dining and living room, bringing in that rustic look. 

 
The base cabinets have been framed for the wash room, and the laundry chute cabinet was being framed this afternoon.
 
 
The base cabinets for the master bathroom were framed out as well this morning and are waiting on vanities and the center cabinet that will house the tv ;)

 
The cabinets upstairs in the girls bathroom are finished, just awaiting the doors in the garage to be put on.  Waiting on cabinet hinges for that part.... I'll update with more cabinet pics once the doors and drawers are all in.

Wednesday, February 6, 2013

Time for some updates!

It's been a while since I've taken the opportunity to update with the house progress.  Everyone said the inside work was the slowest, and I really didn't want to believe them, but it is....  In the last few weeks a little has changed, so let me bring you up to speed. 

First of all, I last left you with the start of a knotty pine ceiling. Well that ceiling is now in, as well as two of the three decorative beams and the trim work was to be finished this afternoon.  Here's the progression of that.


There's also been a lot of painting and staining going on; especially trying to repaint a new color over that green upstairs!

 
Then the trim started going in for the doors and windows.  Yesterday they even sized and hung the upstairs doors and today installed the doorstops and knobs.  Hopefully this weekend we will be able to get them painted and stained!


And then yesterday, they started the vanity for the girls bathroom upstairs.  The hole in the floor is the guesswork for where the laundry chute will come down through another cabinet.  By the progress of things I guess the order seems to be finish from the top down.  Luckily the basement is all done but the baseboard.

Meanwhile life has continued as usual.  Well, a little busier than usual...
 
We've had snow...

 
A Birthday....


An unexpected litter of puppies....


 We've had play time,

 
And we've had down time.... :)


Thursday, January 17, 2013

The start of a knotty pine ceiling

It's been so gloomy and rainy and just a cold, wet, winter outside this week.  They're even calling for snow tonight which has run Jeff and Ken inside to start the finish work in the house.  Yesterday they started installing the knotty pine ceiling panels.  I'm really loving the way they contrast with the green walls.


The pictures above were all taken during my lunch hour, and as you can see, it doesn't go up too fast at all.  The pictures below were taken at the end of the day (notice how the artificial light changes the colors on everything!)


This morning they started on the other side of the room, and here are the lunchtime progress shots from today.  Hopefully by the end of the day tomorrow the ceiling will be finished!  And just maybe I'll get to take some snow shots of the house :-)